Are you working from home, and is your network not working as well as you’d like? Are your video calls freezing, dropping, or choppy? If that’s the case, I have eight tips to improve your (or your users’) work-from-home Wi-Fi network experience.
1. Get Close to Your Wi-Fi Router
Wi-Fi uses two frequency bands, one in the 2.4GHz spectrum and the other at 5GHz. The 2.4GHz signal propagates further than 5GHz, particularly through walls. Unsurprisingly, thicker and more dense material like concrete will attenuate the signal more. Wire screening, low-emissivity glass windows, and metal ductwork will block or reflect Wi-Fi signals. Each barrier in the path between the wireless router and your device causes more signal loss. Water also absorbs the RF energy, so wrapping your hand or arm around your phone or tablet can affect its Wi-Fi connectivity.
So, what’s the solution? Install your Wi-Fi router close to where you need the best connectivity. Sometimes that’s not possible, like when the Internet service provider (ISP) link comes into the house in the basement, and there’s no wiring to your third-floor office. In these cases, you should consider using a mesh Wi-Fi system or a range extender to improve coverage. Just be aware that these systems will typically have lower overall throughput than a wired connection because they have to receive and retransmit network packets.
2. Check for RF Interference
The 2.4GHz channels share frequency bands with many unlicensed transmitters that can interfere with your Wi-Fi. Baby monitors, non-Wi-Fi wireless cameras, and some wireless home phones are good examples. Microwave ovens and motion detection lighting sensors can blanket the 2.4GHz spectrum with enough energy to kill Wi-Fi connectivity. Try to correlate your poor Wi-Fi experience with the use of suspect devices. If you live in a dense area, Wi-Fi interference might be coming from a neighbor.
3. Pick an Unused Channel
Don’t allow your Wi-Fi router to automatically select a channel. Instead, you should specify a channel.
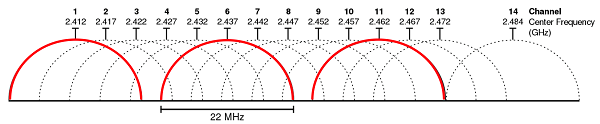
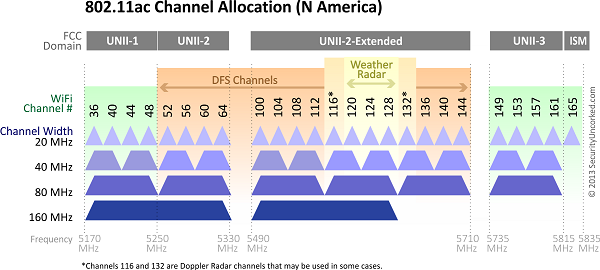
The 2.4GHz spectrum (Figure 1) allows for a total of thirteen channels in the U.S. Of these, only three channels don’t overlap: 1, 6, and 11. To minimize interference, you should configure your Wi-Fi router to use one of these channels. The 5GHz spectrum (Figure 2) has nine open channels, making it easier to select an unused channel and avoid interference.
When multiple Wi-Fi sources are on the same channel, they compete for transmit time. It’s called co-channel interference (CCI). Wi-Fi is a polite protocol, and a device will wait for an opportunity to transmit when no other device on the same channel is transmitting. With enough devices, a channel can become so congested that no device gets much bandwidth.
With CCI, you can have a great signal (full bars) and still have problems because too many devices are on the same channel. One of the worst environments is a crowded apartment building in which everyone has a Wi-Fi router, and there’s no organized allocation of channels to minimize congestion.
4. Use 20MHz Wide Channels
When you’re configuring channels, specify the 20MHz channel width to reduce co-channel interference/congestion. Watch out for Wi-Fi routers that default to 40MHz wide channels. The CCI conflicts with the attempt to get more bandwidth. If you happen to live where there are no other Wi-Fi sources, then you can use larger bandwidths. This may be possible in the 5GHz spectrum.
5. Use Different Names for the 5GHz and 2.4GHz SSIDs
You should configure different network names (SSIDs) for the 2.4GHz and 5GHz networks. Then associate your mobile devices with the best performing network, which will typically be the 5GHz SSID unless you’re out at the edge of its coverage.
You want to avoid the situation where both networks have the same name because your devices will auto-select which band is used. The 2.4GHz signal will typically be stronger, so your devices will connect to it. Unfortunately, this is the more congested band, and it is likely to result in lower throughput.
6. Upgrade Your Old Router
If your Wi-Fi router is more than four or five years old, get a new one, preferably one that supports Wi-Fi 6 (802.11ax), the most current standard. Modern mobile devices support Wi-Fi 6, like the iPhone 11 and later or the latest Apple Macs.
Just so you know, on the horizon is Wi-Fi 6E, an enhancement that opens Wi-Fi 6 to a new set of 6GHz channels. It’s just starting to be available on Wi-Fi routers. It will be a couple of years before it’s available on new generations of devices.
7. Get a Wi-Fi Analysis App
How do you know the best channel to select? Get a Wi-Fi analyzer app for your computer. I like
Wi-Fi Explorer Lite for MacOS/Windows and
Acrylic Wi-Fi for Windows. Both applications have nice graphical displays of channel usage and signal strength, and they make selecting a channel and diagnosing signal strength problems a snap. Frequently, these apps have a nominal cost to purchase, but they can save a lot of time.
8. Test at Each Important Location
Testing will tell you if you have a good Wi-Fi system. You can check your ISP speeds by using a network speed test, such as Ookla’s
Speedtest.net. Wi-Fi speeds should match your network plan. A 300 Mbps plan should provide about that throughput for download. Upload speeds are frequently less. Ookla does a good job of picking a test server that minimizes the path to you. You’ll find that test results will vary on each run and as you select different servers. The highest performance test will be the most accurate measurement of your link. Make sure that you don’t have anyone else in the house using the network at the same time.
It’s best to begin with a baseline by measuring your network performance using a wired connection. Fewer factors are involved with wired links, and the results are more consistent. Then, repeat the Wi-Fi speed test from the locations your use. Start next to your wireless router where there is a better signal, then test at the other work locations. Make sure you’re using the same test server each time. The results will let you know if there’s a problem with your Wi-Fi and which locations work the best. Don’t forget to verify that your device is using Wi-Fi and not cellular connectivity when testing.
Wrap Up
If testing reveals a problem, consider reviewing the above tips to identify the likely one. This is where the Wi-Fi analysis app will pay for itself.